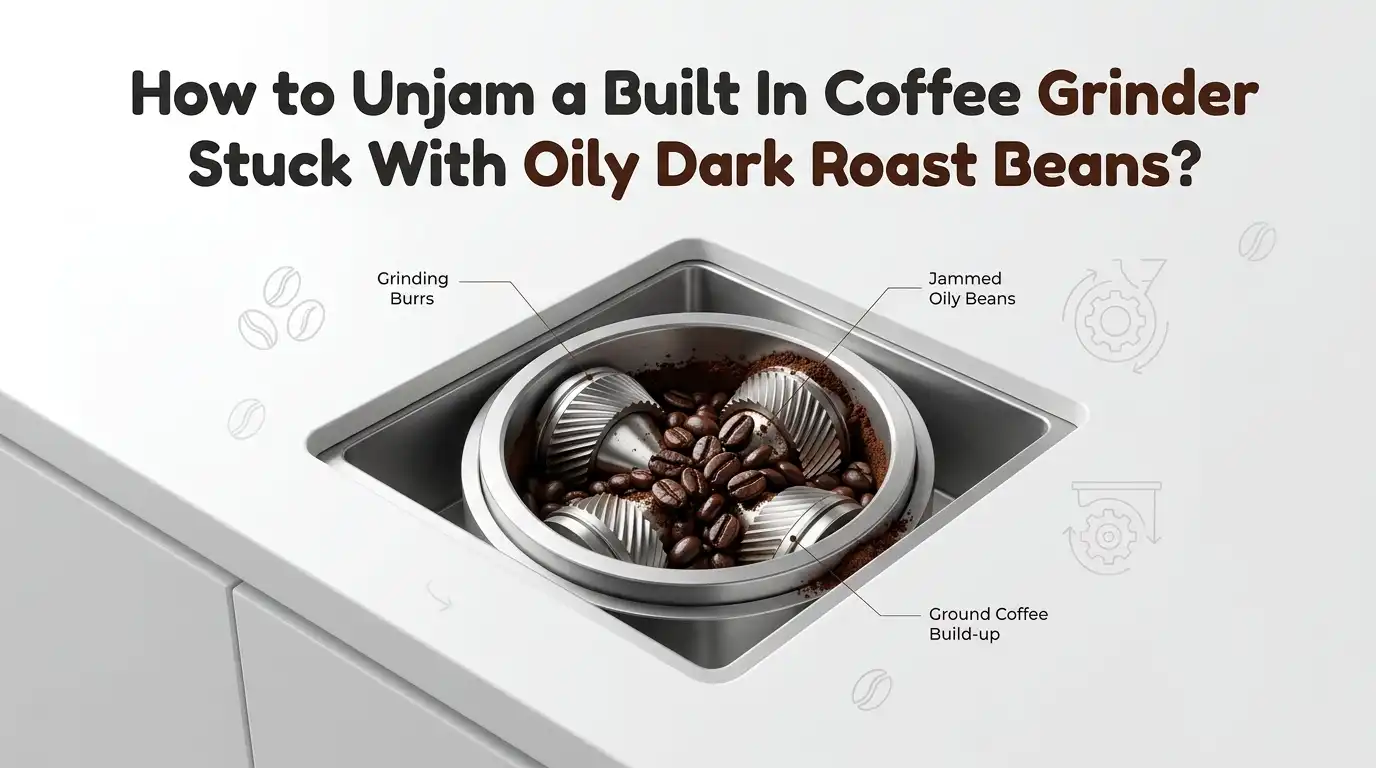
How to Unjam a Built In Coffee Grinder Stuck With Oily Dark Roast Beans?
A built in coffee grinder can feel impossible to fix when it stops feeding beans or makes noise without grinding.
The good news is that most jams come from oil and fine coffee dust, not from a dead motor. Dark roast beans often leave a shiny film on the hopper, burrs, and chute. That film grabs tiny grounds and turns them into a sticky clog.
This guide gives you a clear fix. You will learn what causes the jam, what to do first, what to avoid, and how to stop the problem from coming back. The steps are simple, safe, and practical.
In a Nutshell
- Oily dark roast beans can create a sticky paste inside a built in grinder. That paste can slow bean feeding, block the burrs, or clog the chute. If your grinder hums but does not move coffee, oil and packed grounds are often the cause.
- Start with the safest fix first. Turn the machine off, unplug it if your model allows safe access, and empty the bean hopper. Then remove loose beans and grounds before you try any deeper cleaning. A calm start prevents a bigger jam.
- Use dry cleaning methods before anything else. A small brush, a vacuum, and a clean dry cloth help more than water. Water in the bean area can turn coffee dust into sludge. That makes the blockage worse and can damage internal parts.
- A coarser grind setting can free trapped coffee. If your grinder was set very fine, the burrs may have packed oily grounds too tightly. Moving to a coarser setting, in the correct way for your machine, often helps the grinder clear itself.
- Different fixes have clear pros and cons. Manual brushing is cheap and direct, but it takes time. Vacuum cleaning is fast, but it may miss stuck oil film. Cleaning tablets can help with residue, but they do not replace a full clean when the chute is heavily blocked.
- The long term fix is better bean choice and regular care. Drier medium roast beans usually feed better in built in grinders. A short cleaning routine each week can stop the next jam before it starts and keep your coffee tasting fresher.
Why oily dark roast beans jam built in grinders
Dark roast beans often carry more visible surface oil than lighter beans. That oil is natural, but it becomes a problem inside a grinder.
The burrs crush the beans into tiny particles, and the oil helps those particles cling to metal, plastic, and rubber parts. Over time, the residue turns into a sticky layer that catches even more grounds.
In a built in grinder, the bean path is usually tighter than in a large stand alone grinder. That means there is less room for oily grounds to move through. The result is a slow feed, a blocked chute, or a grinder that spins without producing coffee. The darker and shinier the bean, the more often this can happen.
Pros of understanding the cause: You fix the real issue and avoid random mistakes. Cons: It can be tempting to blame the motor right away, even when the jam is only residue and packed grounds.
Signs the grinder is jammed and not fully broken
A jammed grinder often gives warning signs before it stops fully. You may hear the motor run, but no coffee comes out. You may see beans sitting in the hopper without dropping into the burrs. The machine may brew weak coffee because too little coffee reaches the brew chamber.
Another sign is a change in sound. A normal grinding sound is steady and crisp. A jam often sounds strained, high pitched, or hollow. If the grinder worked fine before oily beans went in, a clog is more likely than a failed machine. That is good news because a clog is often fixable at home.
Pros of checking symptoms first: You save time and avoid taking the machine apart too soon. Cons: Some symptoms can overlap with worn burrs or a damaged part, so you still need to watch for signs that the problem does not improve.
Safety steps before you touch the grinder
Start with safety, even if the fix looks simple. Turn the machine off and let all motion stop. If your model gives access to the grinder area or brew unit, unplug the machine before you put hands or tools near moving parts. Never work around spinning burrs.
Next, check your manual if you still have it. Built in and superautomatic machines differ a lot. Some let you remove the hopper, upper burr, or brew unit. Others keep those parts sealed. Use only dry tools around the grinder area unless your manual says a part is washable. A dry brush and a vacuum are usually the safest first tools.
Pros of a careful start: You protect the machine and yourself. Cons: It takes a few extra minutes, but those minutes can prevent broken plastic tabs, wet clogs, or finger injuries.
Empty the hopper and clear the bean path first
Your first hands on fix should be simple. Remove every bean you can from the hopper. Scoop them out by hand, use a spoon, or tip them into a bowl if the hopper lifts off. Then look for beans bridging over the feed opening. Oily beans often stick together and form a small arch that stops the flow.
Once the hopper is empty, wipe visible oil with a clean dry cloth. If your hopper and lid are removable and your manual says they are washable, you can wash those parts separately and dry them fully before putting them back. Do not pour water into the bean container or grinder area. Moisture and coffee dust make a worse clog.
Pros of this method: It is easy, safe, and often enough for light jams. Cons: It only solves surface buildup and may not reach packed grounds deeper in the machine.
Adjust the grind setting the right way
A very fine grind setting can turn an oily bean problem into a hard blockage. Fine settings create more resistance, and oily particles compact faster. If your machine allows grind adjustment, move it a little coarser. Many grinders need adjustment while the burrs are moving, so follow your machine rules carefully.
Do not jump from very fine to very coarse in one forceful move if the grinder is packed. Make small changes and try a short grind cycle. A coarser setting can help trapped particles move out instead of packing tighter. This is often one of the fastest low effort fixes.
Pros: Fast, no deep disassembly, and very useful when the clog started after a fine espresso setting. Cons: It will not remove oily film by itself, and the setting change must be done correctly for your model.
Use a vacuum to remove loose grounds and small debris
A vacuum is one of the best first line tools for a built in grinder jam. After you empty the hopper, use a narrow attachment to pull out loose beans, grounds, and dust from the feed opening and any reachable chute. Work slowly. Short passes are better than pushing debris deeper.
Some support guides also suggest vacuuming the funnel or chute from both directions if your machine design allows access from above and below. This helps lift packed coffee that sits just beyond easy reach. A vacuum is simple, clean, and low risk when used gently.
Pros: Quick, dry, and good for loose buildup. Cons: It cannot scrub oil film, and it may not clear a hard plug of compacted grounds. If the grinder still hums without output after vacuuming, you likely need a deeper clean.
Clean the burr area by hand if your model allows it
If your grinder lets you remove the upper burr or burr carrier, a hand clean can make a huge difference. Take photos before you remove parts so reassembly is easy. Lift out the removable burr, then brush both burrs with a dry grinder brush or a clean toothbrush used only for this job.
Focus on the teeth, the outer ring, and the little pockets where grounds collect. Tap the machine gently to shake out trapped coffee. Keep moisture away from the burrs and internal grinder chamber. Dry cleaning works best because wet residue sticks and hardens.
Pros: This is one of the most effective ways to remove packed oily grounds. Cons: It takes patience, and not every built in machine gives safe user access. If your model is sealed, do not force disassembly beyond what the manual permits.
Try grinder cleaning tablets for stubborn oil residue
If the grinder runs but still feels dirty after brushing and vacuuming, grinder cleaning tablets can help remove oil film. These tablets pass through the grinder like beans and help break up residue inside the burr path. They are useful after you clear the main jam and want to clean what remains.
Use them only in grinders that accept this type of cleaner. After the cleaning cycle, run a small amount of fresh coffee through the grinder and discard it. Cleaning tablets are a support tool, not a magic repair. They work best after loose debris is already gone.
Pros: Easy, neat, and helpful for oil residue you cannot reach by hand. Cons: They do not replace a deep clean, and they may not solve a fully blocked chute. Also, do not use rice as a shortcut. Rice can be too hard and may jam or stress the grinder.
Clear the coffee funnel and chute on superautomatic machines
Many built in and superautomatic coffee machines have a funnel or chute that carries ground coffee after grinding. This area can clog even when the burrs still spin. If your machine has a removable brew unit or access door, check the funnel and chute for compacted grounds.
Some machines can be cleared with a spoon handle used gently to loosen packed coffee, followed by vacuuming. Others have a special vacuum attachment or a removable drawer that gives access to the ground coffee path. This is often the hidden blockage point when beans grind but no drink comes out. A blocked chute can look like a grinder failure even when the burrs are fine.
Pros: Very effective for machines that still grind but fail to deliver coffee. Cons: Access differs by model, so you must work within the safe user maintenance steps for your machine.
Switch to drier beans while the grinder recovers
Once the grinder moves again, do not refill it with the same oily dark roast right away. Use a drier medium roast or a blend labeled for automatic coffee machines. This gives the grinder a chance to clear lingering residue and reduces the risk of another jam in the next few cups.
You can still enjoy dark roast, but some built in grinders handle it poorly over time, especially if the beans are very shiny. Bean choice is often the long term fix that people ignore. A slightly drier bean can save hours of cleaning later.
Pros: Low effort and highly effective for prevention. Cons: You may need to give up one favorite bean, at least in this machine. If you love very oily dark roast, a separate grinder may handle it better than a built in unit.
Build a simple routine that stops repeat jams
Prevention is much easier than recovery. Empty and wipe the hopper often. Brush the visible grinder area on a regular schedule. Vacuum the feed opening and chute at set intervals. If your machine has a weekly funnel cleaning step, stick to it. Small care sessions stop the oil layer from turning into a thick clog.
A good routine can be simple. Wipe visible oil every few days. Vacuum and brush weekly if you use dark beans. Deep clean the burr area when the machine starts sounding slower or messier. Fresh cleaning also helps flavor because old oil can turn stale and affect taste. Cleaner parts usually mean better flow and better coffee.
Pros: Cheaper than repairs and easy to build into your routine. Cons: It takes consistency. Skip it for too long, and the same jam can come back.
Know when to stop and call for service
Home fixes work well for many jams, but there is a clear limit. If the grinder makes harsh sounds, trips power, smells burnt, or still fails after basic cleaning, stop. A repeated jam can mean worn burrs, a damaged motor gear, or an internal blockage beyond safe user access.
Also stop if your machine requires deep disassembly that the manual does not allow. Built in coffee systems are expensive, and forcing parts can turn a cleaning job into a repair bill. Good judgment is part of good maintenance. If the easy fixes do not change anything, service is the smart next step, not a defeat.
Pros: You protect the machine from extra damage. Cons: Service takes time and money, but it is better than breaking a sealed grinder or motor assembly.
FAQs
Can I use rice to clean a stuck coffee grinder?
No. Rice is a risky choice. It can be too hard for some burr sets and can create a new jam instead of fixing the old one. Use a dry brush, a vacuum, or grinder cleaning tablets made for coffee grinders.
How often should I clean a built in grinder if I use dark roast beans?
A light clean every week is a smart start. Wipe visible oil, vacuum loose grounds, and clear the feed opening. If the beans are very shiny, check the hopper and chute even more often.
Why does my grinder hum but not grind?
That sound often means the motor is trying to turn, but the burrs or chute are blocked. Oily residue, packed fine grounds, or a bean bridge in the hopper are common causes. Start by emptying the hopper and vacuuming the feed path.
Can water help loosen the oily coffee residue?
Do not put water in the bean hopper, burr chamber, or grinder chute. Water mixes with coffee dust and creates a sticky paste. Only wash removable parts that the manual says are safe to wash, and dry them fully before reinstalling.
Will changing to a coarser setting fix every jam?
No, but it can help a lot when the clog formed on a very fine setting. A coarser adjustment creates less resistance and may free trapped grounds. If the machine still fails after that, you likely need brushing, vacuuming, or chute cleaning.

Hi, I’m Emma Lee — the coffee-obsessed creator behind Morning Drip Vault. I spend my days testing coffee machines, exploring brewing techniques, and reviewing the latest coffee gear. My mission is simple: helping you find the perfect machine to brew your best cup, every single morning.